PhotoReflexivity is an interactive creative research method, focusing on reflecting with participants through photography.
Marije ten Brink, lectoraat Civic Interaction Design, CMD Amsterdam
PhotoReflexivity is a research method that uses photography as a tool to gather subjective qualitative data from participants, allowing them to take pictures and interpret abstract topics (prompts) provided by you. This research method is strong because it reveals latent and personal knowledge and answers that are harder to uncover through spoken or written language alone.
You select your participants and allow them to take photos based on prompts related to your research topic. The self-made photos don’t have to be a literal view on the topic – participants are encouraged to use them symbolically, for example to express a feeling they can’t capture in a literal photo. Once the participants have taken their photos, you collect them, print them, and cut them into 9×9 cm formats. Then, organise a reflection session with your participants to discuss what they photographed and why.
By allowing participants to interpret your prompts, you gain a broader perspective on your research topic. Additionally, facilitating a reflection session enables discussion and helps you collect valuable qualitative data. The photos serve a conversation starters during the interpretation session. Participants explore and organise their thoughts and interpretations in a way that feels natural to them, letting their personal insights and emotions guide the conversation, rather than following a strict format. This can lead to deeper and more enriching conversations.
The purpose of PhotoReflexivity is to bring out qualitative and subjective data reflecting on the participant’s interests and perspectives. The creative researcher chooses a topic he/she wants to collect data on. The PhotoReflexivity approach can lead to deep, qualitative insights on participants values and assumptions.
To create layered and meaningful photo prompts, researchers can use the Interpretation Framework to highlight multiple thematic perspectives, such as emotional, relational, and cultural, which can guide the formulation of prompts that encourage deeper reflection from participants.
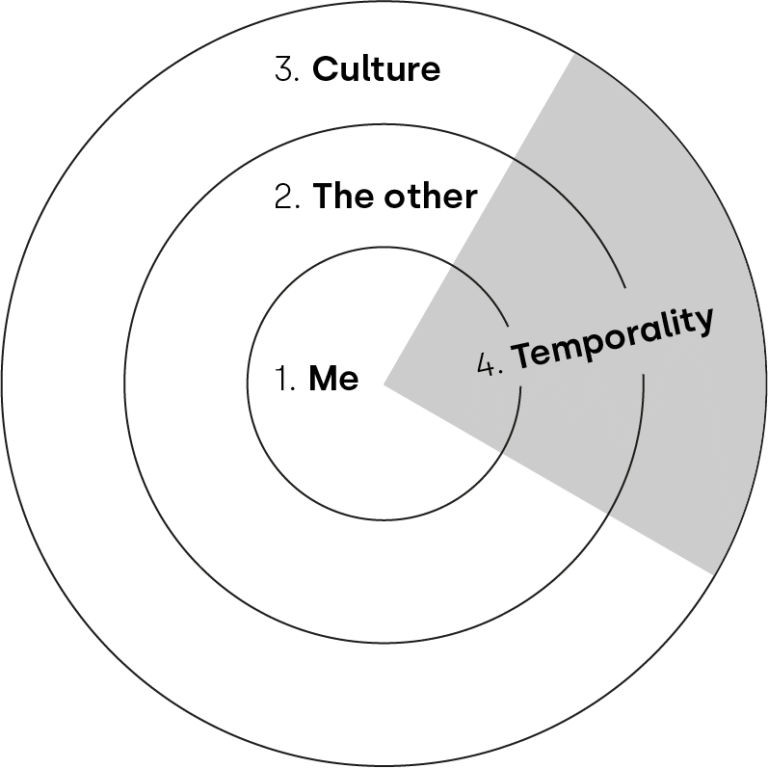
The Interpretation Framework consists of four interconnected frames:
1. Me – related to the participant’s identity and preferences
2. The other – related to interactions with others
3. Culture – referring to a wider, cultural context
4. Temporality – related to the passing of time, which is often used in conjunction with the other three.
See Image 1: The Interpretation Framework.
You start by setting up prompts that you want to use within your topic. Create prompts that are not too literal, but leave space for personal interpretation. Try getting at least three different prompts focusing on different frames from the Interpretation Framework, for example:
The next step would be picking participants, either individuals or groups who align well with the focus of your research.
Then you set out your participants to make pictures, make sure to give them a deadline or timeframe and specify how many pictures they need to take (For example 4 pictures per prompt). Also specify where you want them to deliver their pictures (think of software like Dropbox or Google Drive or a simpler solution such as Whatsapp, although this might affect the quality of the photographs).
Collect the pictures on an A4 (picture size 9 x 9 cm) using InDesign, Adobe XD, Figma or other design tools, print and cut them. Now you are ready to have an interpretation session with your participants
The interpretation session can vary per topic and you can customize and combine it with other creative research methods (for example sorting). The interpretation session is an important part of the method, because this is the moment to trigger conversation between your participants. Do not forget to record and transcribe the interpretation session for later use analysis.
Creating and writing the photo prompts can take a few hours. First, you need to think about the themes you want to explore, especially if you are focusing on open and socially relevant topics. Next, you need to formulate the assignments and write clear instructions for the participants, so they know exactly what to do.
Finding participants and ensuring they have enough time to take photos based on the given prompts is a crucial part of the process. Researchers need to ensure that all participants have the time and flexibility to complete the task.
Participants should be given a time frame between a couple of hours and a couple of days to take photos of the prompts. Once all photos are collected by the researcher, extra time will be needed to print and cut the photos into the required 9×9 cm format. This step can take several more hours, depending on the number of participants and photos involved. Researchers should factor this into their overall timeline.
It’s important for researchers to coordinate the schedules of all participants, as not everyone may be available on the same day. For instance, one participant may be able to complete their photo-taking on a specific day, while another may not be available until the following day. Researchers need to plan accordingly, allowing sufficient time to gather all participants together for the reflection session.
The reflection session, where participants discuss the photos they’ve taken, typically takes one to two hours, but additional time may be required depending on the number of participants and the depth of the discussion.
To support deeper reflection and conversation during the interpretation session, three interactive materials can be used: Photo Position, Photo Profile, and Photo Story. Each material invites participants to think out loud, reflect more personally on their choices, and connect their visuals to broader themes or emotions.
This tool allows participants to connect specific characteristics or qualities to their photos, find similarities between photos and create clusters. The qualities (Mugge et al. 2009) are:
See Image 5 : Photo profile
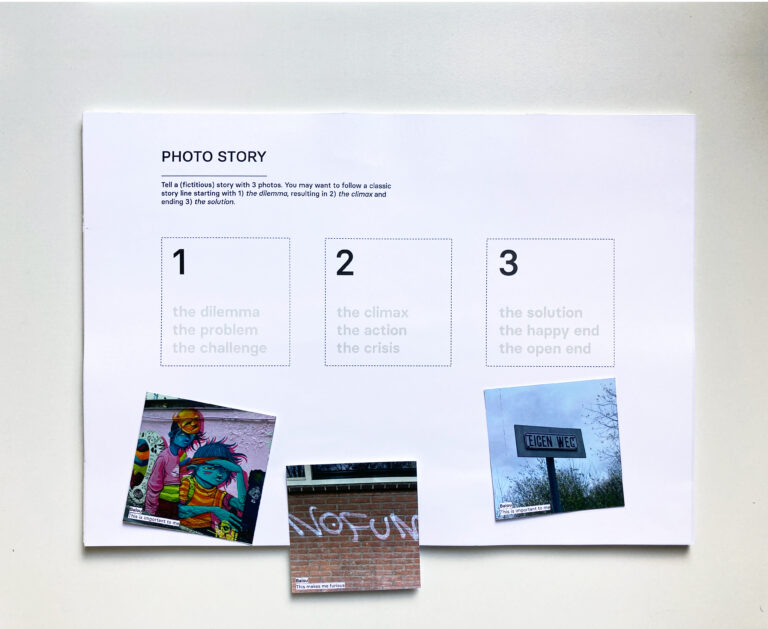
This material supports students is used to create a story using the classic three-act structure. The story can be fictional or metaphorical, often revealing deeper personal views or imaginative interpretations of the research topic.
See Image 6: Photo story
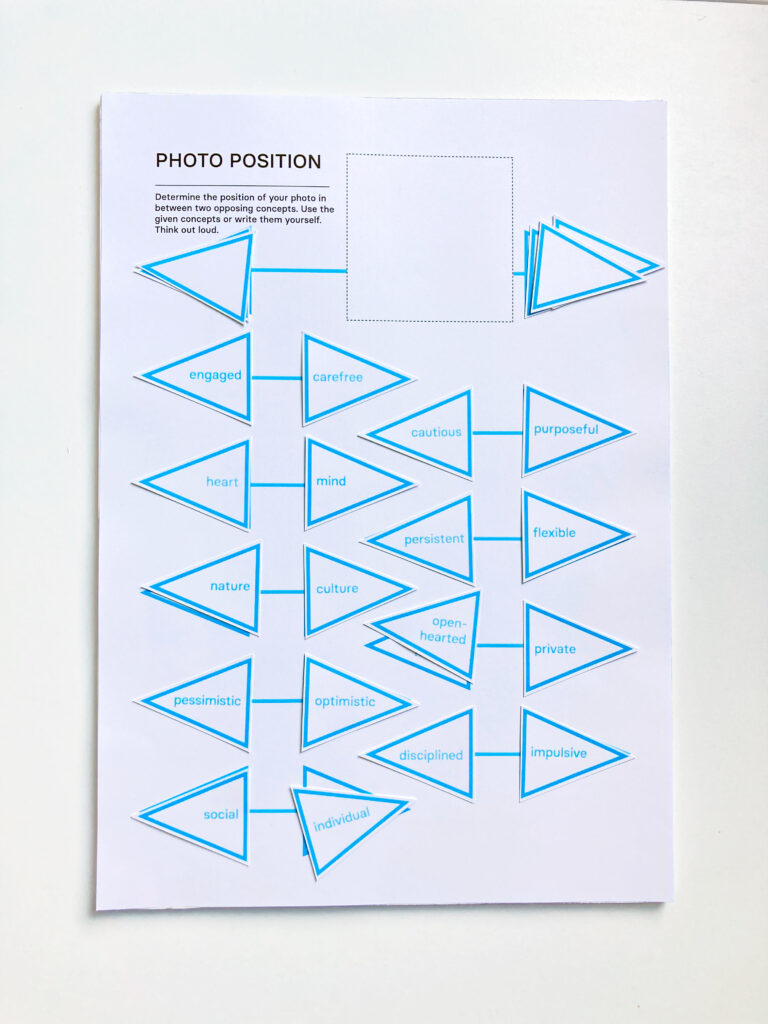
This material helps participants position their photos on an axe between opposites, such as:
See Image 7: Photo position
Photos offer a visual window into personal perspectives, while reflection sessions reveal emotions, memories, and meanings. By listening to participants’ stories and observing their choices, you can uncover recurring themes, social and cultural perspectives, and even unspoken feelings.
Data collected from this method include:
The difficulty of this method lies in the execution of the photo assignments, the collection and printing of the photos. This requires good planning. Also, interpreting the subjective insights emerging from the photos and the conversations between the participants requires mature and knowledgeable research skills.
… and more methods with the tag ‘visual’ on this website.
Hanane Pengel, Jade van der Peet en Kaj-Benjamin Sitanala – Minor Creative Research 2025